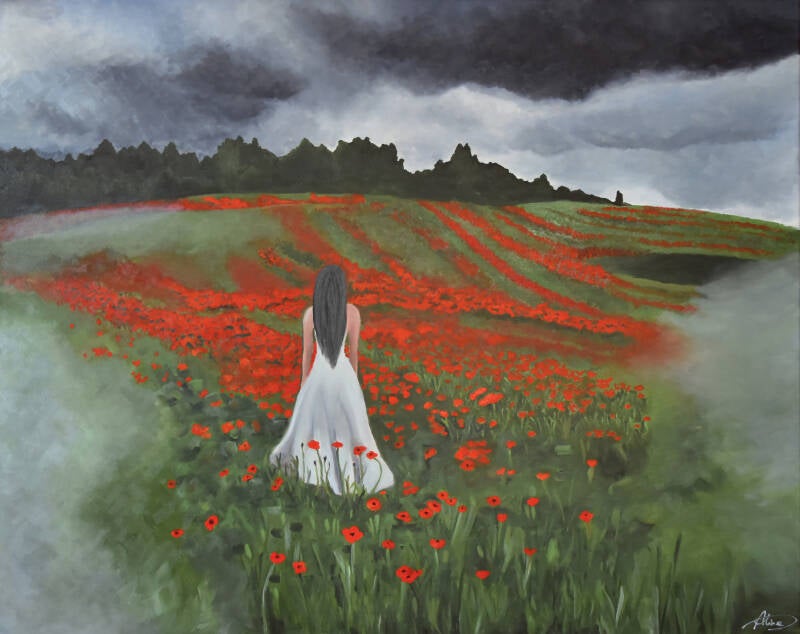
The Vision
Over the course of three weeks I transformed a blank 100 × 80 cm canvas into a vivid landscape that balances realistic detail with the dreamy, slightly abstract atmosphere I love. The scene features a big poppy field, rolling hills, woods, and a dramatic, cloud‑filled sky.
Step 1 - Sketching & Pencil Under-drawing
Every large‑format work starts with a solid skeleton. I started with a few pencil studies to decide on the composition, the placement of the character, the perspectives, and the values. Then, I draw the basic composition in graphite directly on the canvas.
Step 2 – Blocking the Big Areas
With the sketch locked in, I moved straight to blocking in the large color fields using broad brushes. At this stage I avoided detail, focusing instead on overall mood and spatial relationships
Step 3 – Shaping the Dreamy Grass
The grass is the heart of the piece. I wanted it realistic enough to anchor the viewer, yet retain that ethereal, abstract quality:
I started by applying different shades of green with a medium-sized brush to spread the paint evenly and create a base. I added shades of red with a medium-sized brush. Once everything was dry, I used short, varied strokes to represent the rows of poppies in the distance. I added details later.
Step 4 – Adding Mist and Vignette
To draw the eye inward, I painted mist in the outer corners, creating a subtle vignette effect. I learned this compositional technique from Tim Packer's online classes. Thin layers of bluish gray, pastel green, and white fade toward the edges, giving the canvas a quiet, enveloping atmosphere that frames the central action.
Step 5 – The Cloudy, Stormy Sky
The sky required the most concentration, taking about two hours of work to stretch the light and dark tones with my cross-hatch brushstroke technique. However, I loved painting this stormy sky. Seeing it gradually take on a realistic appearance was like a form of meditation.
Step 6 – Fine Details
Once the main elements were defined, I focused on the small but crucial details:
Light on the woods – delicate touches of light green to suggest light.
The poppies – the outline of the petals, the pistils, and a few subtle color gradients ranging from quinacridone red to orange.

Central character's dress – folds rendered in soft, subtle shades that echo the surrounding landscape.
Blades of grass – I added individual blades of grass in the foreground, using touches of dark green, light green, black, and white.
Step 7 – Varnishing with Gamblin Gamvar
After the paint fully dried, I applied a thin coat of Gamblin Gamvar Varnish. I favor this varnish because:
- You can add it after only a few weeks of drying, not the typical 6‑12 months that usually apply for oil paintings.
- It’s easy to apply, leaving a clear, non‑yellowing finish that enhances color depth while protecting the surface.
The result is a vibrant, protected masterpiece that will age gracefully.
To conclude
By sharing the entire workflow—from pencil sketch to the final Gamvar coat—I hope you feel a personal connection to the piece. Understanding the hours of research, experimentation, and patience that went into each element transforms a simple purchase into a shared artistic experience.
If you’d like to own this original canvas (or explore my other artworks), head over to the Paintings page on my website. Each painting ships securely with a certificate of authenticity and a personalized handwritten note.
I hope you liked this creative process insight and down below, you'll find some useful links of the material I used to create this painting; You got me Red and blue (Qilolo).
Gamblin Varnish at K&M Evans (Ireland) : https://store.evansartsupplies.ie/product/23889/Gamblin-Gamvar-Satin-250ml/
Cobra water mixable Oil paint: https://www.gerstaecker.ch/fr/Peinture-a-l-huile-COBRA-diluable-a-l-eau-a-l-unite.html
Online course: Color & Composition by Tim Packer https://www.timpackerartacademy.com
Add comment
Comments